
A Candy Cane Christmas - Cover Quilt and Tutorial
- SunRae Designs
- Nov 17, 2023
- 7 min read

Updated: Dec 12, 2023

I am excited to announce that my first quilt pattern, A Candy Cane Christmas, is here! I have dreamed of writing my patterns for a while and finally took the time to write one. I am beyond excited and thankful for all of your support.
In this blog post, I will share all my tips and tricks to create your own
A Candy Cane Christmas Quilt Top.
Picking your Fabric

Choosing your fabric and color scheme may be fun but also daunting—at least, it is for me. After all, there are endless color options and an outstanding number of beautiful fabric prints to choose from. My advice is to have fun!
I came up with this color scheme by using my scraps while I was practicing my blocks. I loved it so much that I ran with it.
So please do not fret over this part because this pattern comes with a coloring sheet for you to play around with. I encourage you to get creative while coloring and use any color that comes to mind. You don't have to color each block the same. You can use the coloring sheet to explore the beauty of color. And then, when you are happy with the way you look, roll with it.
This pattern also shows different colorways to help jumpstart your imagination. It also has a scrappy version if your heart wants to use up all your beautiful fabric. The main point is to have fun while making your decision! I've yet to see a quilt in which I don't find beauty. I enjoy seeing the styles and variations one quilt can produce because others make it.
Prepping your Fabric

There is a debate about laundering fabric before beginning a project between quilters, but I don't pre-wash it before I start. Here are the main points between the two, so you can decide for yourself.
Pre-washing and drying cause the fabric to shrink, which may distort after your quilt has been quilted. It also removes harsh chemicals that can irritate sensitive skin. Pre-washing helps prevent fabric bleeding between light and dark fabrics—if I fear this, I pre-wash.
Not pre-washing will allow shrinkage after the quilting, giving it a cozy look and feel. Also, the fabric manufactured now is "not" supposed to have any bleeds. The starches and sizing agents added to the fabric make it easier to piece. And for me, it's simply less to do. But you decide for yourself!
Ironing your Fabric
Whichever method you decide on, ironing your fabric is a must before you start cutting. Skipping this step will cause inaccurate cuts, leading to inaccurate piecing, creating an inaccurate block size and non-matching points. I don't know about you, but I love accurate seams and points, so I do not skip this step, except when cutting my backing.😜
To help get out those hard creases, use a water bottle to spritz the fabric.


Cutting your Fabric
Now that your fabric is ready, it's time to cut.

First: Square Fabric
Square up your fabric by combining WST (wrong sides) and matching the selvedge edges at the top.

Then, align the bottom edge with your long ruler along the fabric fold.

Leave about 1" of fabric extending past the ruler and cut.

Second: Cut Strips
Cut your strips by aligning the ruler's edge down the cut fabric edge at the correct measurement, and cut.
Continue this until all the strips have been cut.
I can cut with my left hand, but if you find this difficult, rotate your fabric after squaring it up.
If you have a Stripology Ruler, use it after you have squared up your fabric. I don't have one yet, but I am currently awaiting its arrival!


Here is my hack for cutting strips without a Stripology Ruler.
Using your widest ruler, align the ruler edge down the cut fabric edge at the correct measurement and cut.
Now, gently move your ruler without moving your fabric, aligning the ruler edge with the cut fabric edge, doubling the correct measurement, and cut.

Continuing to add the correct measurement to your last cut, for example, these strips were cut at 2½", and I used my 12½" square ruler. So my first cut was aligned at 2½", my next cut was aligned at 5", my next cut was at 7½", the next was at 10", and my final cut was 12½", for a total of (5) 2½" x WOF strips.
I continued this until I had the correct amount of strips.


Third: Sub-cut Strips
With RST (right sides together), layout your strip with the selvedge edges to the right and the folded end to the left.

Align the bottom of the ruler with the bottom of your strip and selvedge edges extending past the ruler edge, and cut off the selvage edges.

Then, align the ruler's edge down the cut fabric edge at the correct measurement and cut.
Continue this until all sub-cuts are complete.
Remember, if you have difficulty cutting with your left hand, rotate your strip in the opposite direction.

Here is my hack for sub-cutting without a Stripology Ruler.

With RST (right sides together), layout your strip with the selvedge edges to the right and the folded end to the left.

Align another strip on top, with the top edge running down the middle. Continue this until all strips are laid out, or as many as you are comfortable with.


Using your longest ruler, align the bottom edge with the bottom of your strip and selvedge edges extending past the ruler edge, and cut off the selvedge edges.

Then, align the ruler's edge, down the cut fabric edges at the correct measurement, and cut.

Now, carefully move your ruler without moving your fabric, align the correct measurement with the new cut edge, and cut.


Continue doing this until all sub-cuts are complete.
Remember, if you have difficulty cutting with your left hand, rotate your strips in the opposite direction.


*Note: This method requires complete attention to the alignment of the strips and the ruler.
Also, do not use this method to cut your side triangles.
Stay Organized
This pattern has many pieces. Print and cut out the labels, then pin or clip them to the top piece of your fabric stack. This helps tremendously.


Sewing Half Square Triangles Without Marking
Make your diagonal seam tape or purchase some to sew your HST accurately.
I will show both ways.
Making your own Diagonal Seam Tape out of General Purpose Masking Tape

First, determine the length of tape needed by measuring from the end of your needle-stitch plate to the end of your slide-on sewing tray. The tape width will be ½".
I have a slide-on tray with measurement guides. However, a window that allows for bobbin visibility puts a 2½" gap between my guides. So I had to make a piece of diagonal tape that measures ½" x 2½".
Second, now that you know the length, tear off a piece of tape a little longer than the size you need and tape it to your cutting mat.

Align your ruler's edge down the masking tape at the ½" mark and cut excess tape. Now cut from the top and bottom to the length needed.

Third, align the ruler edge down the tape edge at the ¼" mark and draw a line down the middle of your tape.


Finally, attach your made diagonal or purchased tape to your machine, starting at your needle plate and running down to the end of your sewing tray.
*Take a look at this blog post for instructions on how to attach your tape*

Time To Sew

With your two squares RST, align the top diagonal point with your ¼" foot and the endpoint with the inside of the right edge on your made diagonal tape or the black edge line of your purchased tape.
Start stitching and keep the bottom point aligned with the inside of the tape edge or black line the entire time.
Once you have completed the stitching, rotate your block clockwise by bringing the bottom diagonal point to the top and the top diagonal point to the bottom, and repeat the same process.
Check your work and ensure that your 2 HST can be cut down to the correct size by measuring the distance between your stitch lines. If that measurement is ½ ", chain piece the batch before rotating the chain piece again.
Cutting Apart Your Chain Pieces
I recently bought a thread cutter, and I'm not going back. "But I will also show my hack.


Here is my scissor hack.
Cutting apart Half Square Triangles

Trimming Half-Square Triangles
I have tried several rulers for trimming HST, and I use an Omingrid square ruler. This ruler helped me have more control over my block and created an accurate cut. I've included videos of all the rulers I used.

First, cut down the marked diagonal line or in between the seam lines from corner to corner if you didn't mark. Then, press all seams open.

Next, align the ruler's diagonal line along the diagonal line between your two fabric pieces.
Then, bring the ruler 2½" mark around all four sides with extra fabric extending past the correct measurement, and trim the right side and top edge.


Now, rotate your block clockwise with the cut edges on the left and bottom. Align the diagonal line of your ruler along the diagonal line between your fabrics and the 2½" mark running down the left side and bottom edge, and trim the right side and top edge.


Yay!! You have a trimmed HST.
Continue this until all HST are trimmed to 2½" square.

Sewing the Snow Ball Corners Without Marking
This method will use the diagonal tape as well. But for the snowball corners, align the top diagonal point with the sewing needle and the bottom diagonal point with the middle line running down your tape. Start sewing, but keep the bottom point aligned with the center line the entire time. Check your work, then continue chain-piecing all the snowball corners using this method.
Trimming Snow Ball Corners Fast and Easy

Watch Videos
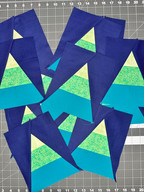
Sewing and Trimming Tree Triangle Blocks


Pinning Blocks Together
Staying Organized
Sewing The Blocks Together
Creating the Perfect Point
Even with your best efforts, the "perfect" point might not happen, but you will have more chances with these tips.
Pinning
Sewing
I hope you enjoyed reading this blog and that it helps you create your own
All the notions I used are listed on my Amazon Affiliate Page.

Happy Quilting,
Amber Foret


Comments